Need for I2C LCD
The ESP8266 NodeMCU is a great development board for Wi-Fi related applications. Another advantage of this board is the GPIO Pins. After taking out all the dedicated GPIO pins (for SPI Flash IC and UART) we get around 9 GPIO Pins free to use. But what if you want to interface a 16×2 Character LCD Display with ESP8266 NodeMCU? Even in 4-bit Parallel communication mode, the 16×2 LCD will take up 6 GPIO Pins of the microcontroller (four for Data, one for RS and one for E). Using that many GPIO Pins for a character LCD Display is not feasible, if you are planning to interface other important sensors and devices. This is where the I2C LCD Module comes handy. It is designed specially for 16×2 and 20×4 Character LCD Displays and communicates through, well, I2C interface. Thus from 6 GPIO Pins, we have come down to two GPIO Pins (SDA and SCL of I2C).
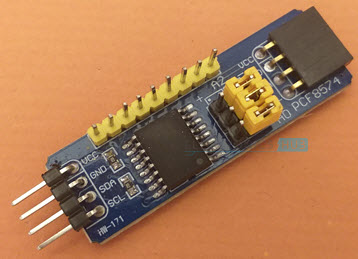
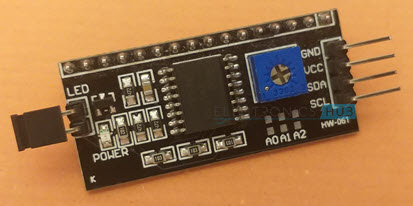
A Brief Look at PCF8574 I2C LCD Module
As the name suggests, the PCF8574 I2C LCD Module is based on the PCF8574 GPIO Expander IC. Originally, it is used in modules to expand the GPIO Pins of a Microcontroller and it communicated with the microcontroller through I2C Interface.
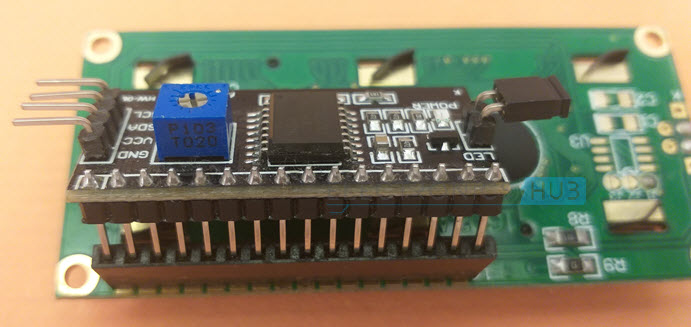
Instead of GPIO expansion, the I2C LCD Module is dedicated to drive a character LCD. So, its pinout coincides with a typical 16×2 LCD, it contains a potentiometer to adjust the contrast and also a jumper to enable or disable the backlight.
ESP8266 NodeMCU I2C LCD
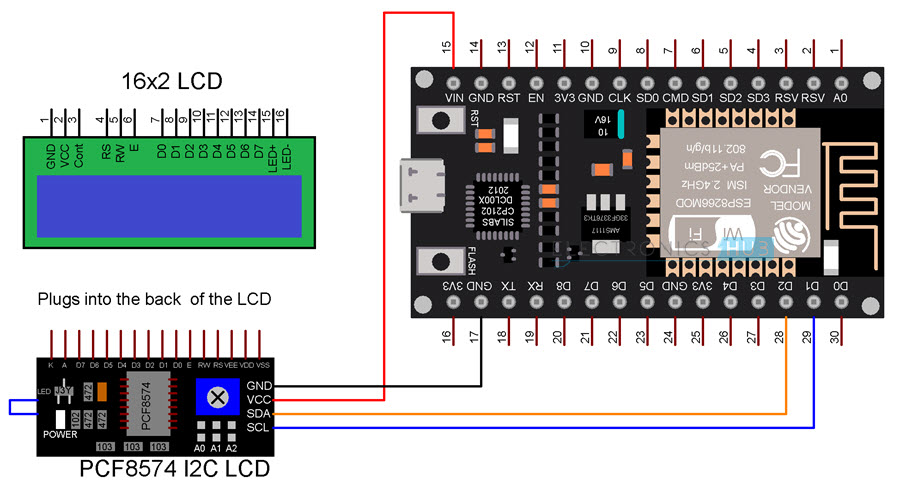
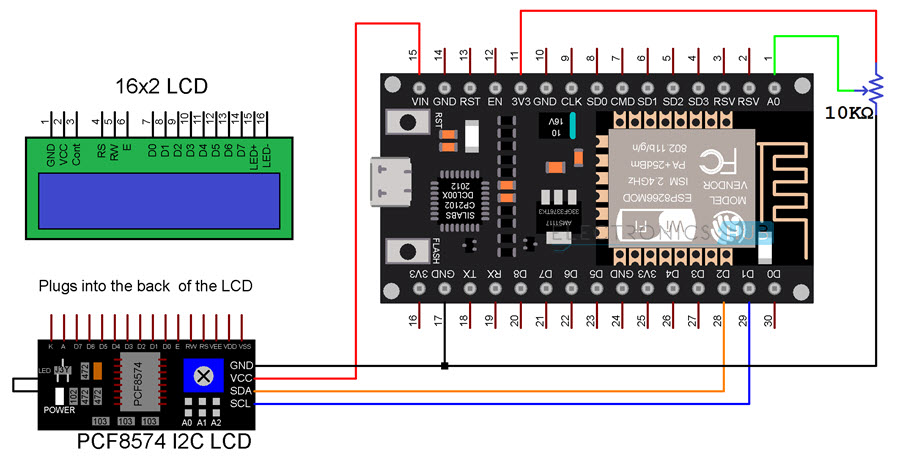
Let us now understand how the ESP8266 NodeMCU I2C LCD Interface works. If you remember the pinout of ESP8266 NodeMCU, D1 and D2 i.e., GPIO 5 and GPIO 4 are frequently used for I2C Communication. D1 (GPIO 5) is the SCL Pin and D2 (GPIO 4) is the SDA Pin. We have to use these two pins to connect to PCF8574 I2C LCD Module. There are no other connections between I2C LCD Module and the actual LCD itself as the Module simply plugs into the pins of the LCD Display. You only need to provide the supply and I2C connections.
The following table shows the connections between I2C LCD Module and ESP8266 NodeMCU. NOTE: The LCD Display works on a supply voltage between 4.7 V and 5.3 V. So, even though PCF8574 IC works at 2.5 V to 6 V supply, instead of giving 3.3V from the NodeMCU, we are giving 5V.
Components Required
ESP8266 NodeMCU PCF8574 I2C LCD Module 16×2 Character LCD Display Breadboard Connecting Wires
Circuit Diagram
The following image shows the circuit diagram of ESP8266 NodeMCU I2C LCD Interface.
Preparing Arduino IDE
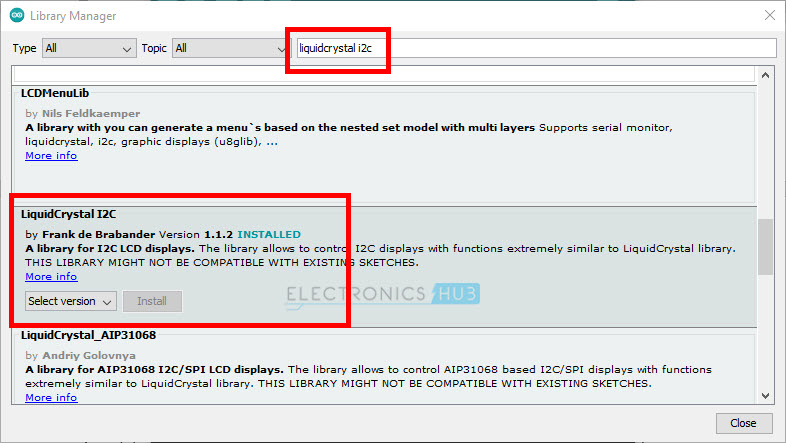
If you haven’t worked with I2C LCD Module before, then you have to download a special library. Open Arduino IDE and go to Tools -> Manage Libraries. . . Search for “liquidcrystal i2c” and download the “LiquidCrystal I2C” library by Frank de Brabander.
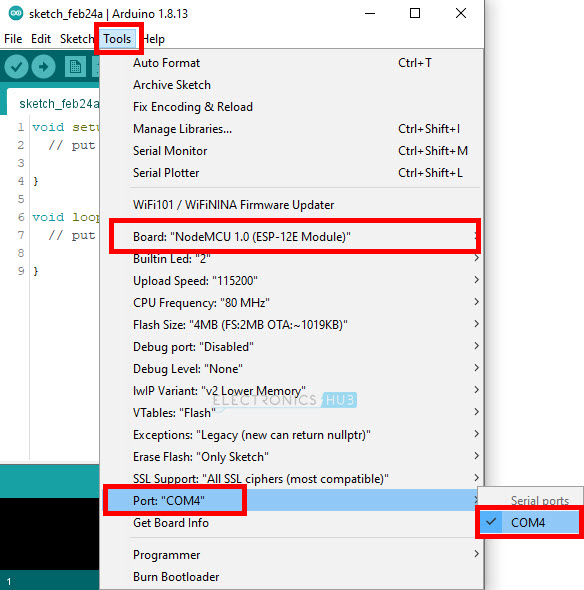
I used this library in a couple of previous projects. So, you can see that it is already installed for me. Now, make all the necessary connections as mentioned before and plug in the ESP8266 NodeMCU to the computer. Make sure that NodeMCU is selected in the boards and also set the right COM Port.
Getting the Slave Address of I2C LCD Module
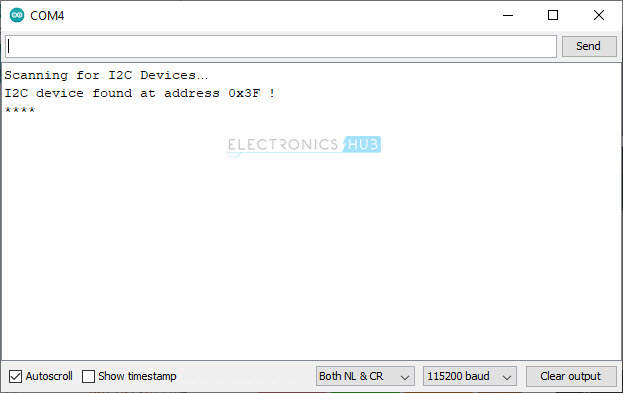
Before writing the actual code to display stuff on the LCD, we have to first determine the Slave Address of the PCF8574 I2C LCD Module. If you remember basics of I2C Communication, a master can communicate with a slave only if it knows the slave address. Here, the ESP8266 NodeMCU is the I2C Bus master and the PCF8574 I2C LCD Module is the slave. So, let us use the following code to get the slave address of the I2C LCD Module. After making all the connections, upload the code to ESP8266 NodeMCU and open the serial monitor.
Code
ESP8266 will look for any slaves and if a slave acknowledges, it gets its slave address and prints it on the serial monitor. In my case the slave address in 0x3F. we have to use this slave address in the main code.
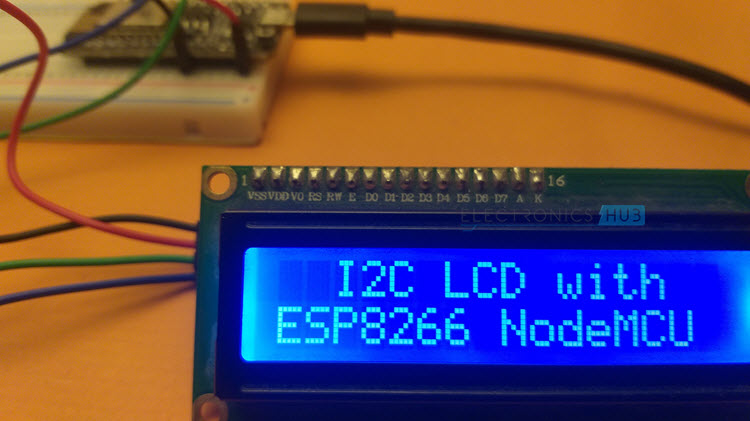
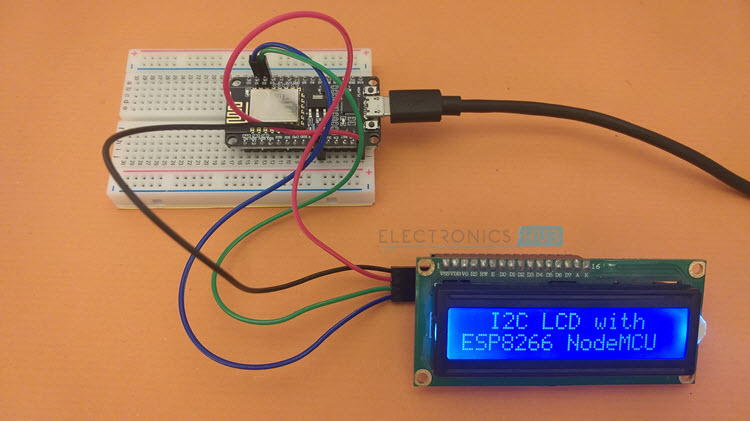
Displaying Simple Text
Now, let us see how to display a simple text on the 16×2 LCD using ESP8266 and I2C LCD Module. There are no extra connections as the previously made connections are all that we need.
Code
ADC Value on LCD
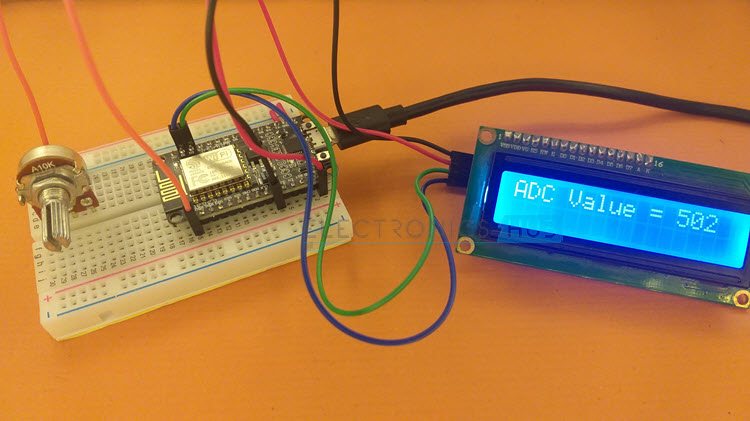
As a bonus, I made a small circuit in which a 10 KΩ Potentiometer is connected to the ADC pins of NodeMCU (labelled A0) and display the result of ADC on the LCD using the I2C LCD Module. If you remember the specifications of ESP8266, its internal ADC has a resolution of 10-bit. So, the output of the ADC will be a number in the range of 0 to 1023. Also note that ESP8266 has only one ADC Channel. On the NodeMCU board, the ADC Pin is marked as A0. The wiper pin of the 10 KΩ Potentiometer is connected to A0 of NodeMCU. Other two pins of the potentiometer are connected to 3.3V and GND respectively. WARNING: Connect the POT only to 3.3V. Do not connect the POT to 5V as ESP8266 ADC cannot tolerate more than 3.3V.
Circuit Diagram
The following image shows the circuit diagram for connecting 10 KΩ Potentiometer to ESP8266 NodeMCU and displaying the result of ADC on the I2C LCD.
Code
Conclusion
A simple tutorial on interfacing PCF8574 I2C LCD Module with ESP8266 NodeMCU Development Board. You learned the important of I2C LCD Module, how the ESP8266 NodeMCU I2C LCD Interface works, how to display some text on the LCD. You can even display some special characters or make a scrolling text. Comment * Name * Email * Website
Δ
![]()
![]()
![]()
![]()
![]()

